📺 Elevate Your Viewing Experience with Confidence!
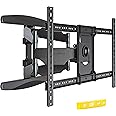
The InvisionUltra Strong TV Wall Bracket Mount is designed for TVs ranging from 37 to 75 inches, supporting a maximum load of 50kg. Its ultra-slim profile allows for close wall mounting, while the double arm design ensures stability and flexibility with a 160° swivel and adjustable tilt. Compatible with various VESA standards, this mount includes all necessary installation hardware and a step-by-step guide for easy setup.


P**R
An excellent mount that requires some care and thought with fitting
This is a great wall mount for flatscreen TVs. I've previously mounted a TV on a wall on a budget mount, and found it sagged a little. So this time I thought I'd buy a really sturdy mount for my new TV. This Invision bracket is rated at 50Kg and my TV weighs around 10Kg, so it really shouldn't have to break a sweat holding my TV, and indeed it doesn't.The mounted TV moves with ease but doesn't swing aroung loose, and I'm really very happy with it. Adjustment is simple, if a little fiddly for horizontal level, made easier with the provided spirit level, and vertical tilt is simple and easy to adjust.Though the Invision doesn't break sweat carrying my TV, I certainly did when fitting it. The job involved a trip to B&Q and a heady mix of despair, harsh language and inspiration. I'll walk you though the process, and hopefully it'll make fitting it less aggro if you buy one.Firstly, as another reviewer helpfully pointed out, the bracket is in two halves, and you really need to have the two halves apart before fitting. So remove the front plate from the bracket body (see pic). I suggest you screw the two bolts you unscrewed to remove the front plate, back into the front plate for now, that way you will find them quickly later.Now attach the two horizontal arms to the plate you've just removed, in the middle of the arms, with the two bolts provided. (There's a spanner in the set, but I found a small socket set to be easier to use.). You can fully tighten these bolts.Okay, next you need to work out how your TV is going to attach to the bracket. I did this by lining up the vertical arms on the back of my TV, and then bolting the vertical arms in the correct place on the two horizontal arms of the front half of the bracket. Do this fairly loosely for now so they can still move a bit. Next, determine which screws fit into the VESA holes on the back of your TV. No need for the bracket, just see which of those silver bolts fit, you'll only need to find *one* that fits, all the other VESA holes will be the same size as the one you find. (There's a load of them supplied with the bracket, so you should find a set of bolts one that fit your TV.) Once you've worked out which bolts to use, bolt the front half of the bracket onto the back of your TV. Two things to note here:-1) Remember to use the spacers provided with the set, there's two sizes. (I used the smaller ones on my TV, but if your VESA holes are sunken, you might need to use the larger ones.)2) Make sure you position the front half of your bracket on the back of your TV so you have access to any connection sockets (HDMI etc.) on the back. See pic. (My power socket is obstructed, but I can just get the power cord in because it's a right-angled connector.)With the vertical bars now bolted and spaced to the back of your TV, now you can fully tighten the vertical bars onto the horizontal bars on the front half of the rack. So that's the front half done, and you have the front half of the bracket fixed to the back of your TV.Okay, now it gets trickier. Work out what height you want your TV to be on the wall. I thought about the same height as it was on the TV stand, but my wife fancied the TV a little higher. Anyway, once we'd sorted out the height (standing the TV on blocks of wood to raise the height until we reached agreement), I temporarily fixed the rear half of the bracket onto the front half. Be careful with your TV if you do this, as it's no longer balanced on its stand, and may fall over backwards with the weight of the bracket. With the TV on blocks at the correct height, I then extended the bracket backwards to the wall, put the provided magnetic spirit level on the top, and tilted the bracket on the TV until it was level, then marked the hole positions on the wall for drilling. I used a bradawl to make a starting hole in the wall, checked again that it all looked okay, and then removed the rear half of the bracket from the TV, and moved the TV out of the way before I started drilling.If all this is getting a bit long-winded for you, then just read this: ONCE YOU SCREW THE COACHBOLTS INTO THE RAWPLUGS IN THE WALL, THEY WILL NOT COME OUT WITHOUT DAMAGE TO THE RAWPLUG/THE WALL/YOUR SANITY (delete as applicable).Still with me? Okay, I drilled the first hole, top centre and knocked one of the supplied red rawplugs in. I wanted to check that the other holes lined up, so I held the rear half of the rack up to the wall and partially screwed one of the six coachbolts into the rawplug. Thus began my problems.All the other bradawl dents were still lined up, so I figured I could remove the coach bolt, drill the other holes, and bolt the bracket to the wall. I figured wrong. It turns out, that once you have screwed your coackbolt into the supplied rawplugs, they *really* do not want to come out. As my first hole had gone into mortar, rather than brick, I quickly discovered two things: Firstly that the coachbolt was jammed in the rawplug. Secondly, and more worryingly, that the rawplug was rotating freely in the wall.Uh oh!Despite this setback, I figured I could just pull the rawplug out, jam in some packing to hold it, and tighten it up, relying on the other 5 bolts to hold everything in place. It was a reasonable plan, but while three of the remaining five went in nice and tight, unfortunately another one of them at the top did not grip the wall well enough to resist the tight fit of the coach bolt, and started rotating in the wall. So I was now stuck with a bracket half attached to the wall, with four bolts I could not risk undoing, and two others that were not held in properly. At this point I became somewhat vexed, and for a time there was great wailing and gnashing of teeth.Once I'd calmed down and had a think, here's what I did. I trashed the two loose rawplugs with cutters, and managed to get them out of the wall (remember, the bracket was partially bolted to the wall, so I couldn't just pull them straight out of the wall as the bracket was in the way). I got some 12mm rawplugs and 8mm coachbolts from B&Q and used them in the now larger holes. (See pics. Note the packets show the B&Q coachbolts and rawplugs I used in the holes which were now too loose for the supplied size rawplug and coachbolt.)The moral of the story is to only screw the coachbolts in to the wall when you have no intention of removing them afterwards. Anyway it all went okay eventually, and you can see in the pic how it looked on the wall with the rear half of the bracket bolted into place. Then I clipped the handsome plastic covers on and it looked pretty smart. (see pic), bofore hanging my TV onto the bracket, adjusting it for horizontal before bolting tight, then setting the vertical tilt before tightening.Finally, I removed the feet from the TV, and taped up the locating holes as advised by LG to prevent insect ingress into the TV. And that's the job done.Now I've finished the job, I'm very happy with it. But I have to admit, it was a pain to fit. However now fitted, it's rock solid. There is not so much as a hint of any wobble or sag at maximun extension. Just as I'd hoped.So in conclusion, there's nothing wrong with any part of the product, and I highly recommend it. But be warned, you only get one shot with those rawplugs.
L**Y
Quality piece of kit!
Very solidly build, with easy to follow instructions for assembly and fitting. The wall fixings supplied - often an area where I find manufacturers seem to cut corners and provide cheap parts which make fitting a nightmare - are in this case reassuringly huge and solid. It's also supplied with a variety of bolts and spacers to fit different TV's. I've hung a 65" TV on it and it's all very sturdy.I would definitely recommend and will buy this brand again if I ever need another.
P**T
Quality item
Very good quality. Liked the way all the screws etc were labeled clearly. Straight forward to install
A**R
Okay..but find something better
Despite a lot of great reviews, we found this product okay. We liked the design but now we feel an arm like system would be better which would have allowed us to lower and raise the height rather than just tilt the TV.The product quality is good except for the bolts which were terrible. Two snapped, one inside the wall so had to drill another hole sadly. The mount itself however is solid and secure and there are no vibrations felt even when the volume is quite high. Overall, we can make do with it for now but in hindsight should have invested more and got something better.Edit: After an extended conversation with an excellent customer support I have upgraded my rating from 3 starts to 5 stars. They pointed out what could have gone wrong with the mounting procedure particularly related to drilling and provided replacements. This has resolved any pending issues which I had with the product. Thank you. Definitely recommend this product.
O**G
Holding well
holding great a week in despite only having 5 of the 6 wall screws in place.4 stars because the tilt mechanism is a bit rudimentary and a hassle to initially screw in. They also only provide just 4 of each washer and a limited variety of washers
T**E
The quality 👌
This is the second time I am purchasing this.I highly recommend it the customer service is absolutely amazing.
B**R
This is very strong and not difficult to fit.
It is very strong, easy to fit and can be tilted/angled to suit. Very sturdy piece of kit!
S**Y
VERY STRONG PRODUCT
Very strong and easy to fit, directions a bit vague but take it slowly and it works out well.
Trustpilot
1 week ago
1 week ago